 Skip to content


How To Hang and Remove Felt Sound Panels
Some sound dampening products are more of a hassle than they’re worth. However, the beautiful thing about Felt Right’s felt sound panels is not only their ability to dampen sound, but their easy installation process. With Felt Right, you never have to worry about causing damage to your walls or spending hours trying to configure your sound dampening installation. Our sound panels make things easy, from start to finish.
This blog gives you a complete description of how to hang and remove your Felt Right sound panels. With this brief guide, you will be well on your way to a more peaceful home environment. Whether you plan on hanging your felt panels in your office or your living room, Felt Right’s felt panel installations bring a sense of calm and focus that starts the second you bring out your level and pencil.
Felt Right’s installation and removal processes simplify the entire installation. With our standard, paint-free, peel-and-stick felt wall panels, you can hang and remove our felt sound panels over a cup of coffee on a Sunday afternoon. Or you can make it a fun date idea with your significant other.
Don’t waste your time surfing the internet looking for videos and instructions on implementing sound dampening material. Remember, these materials should reduce the stress you feel when you’re at home, not add to your already busy schedule.

What Tools Do I Need To Hang My Felt Sound Panels On the Wall?
While Felt Right’s sound dampening tiles enjoy a high noise reduction coefficient, they also have a minimalist design, meaning you won’t need a bunch of tools to enjoy a pure sound environment. Break out the level and a pencil and you’ll be well on your way to hanging your Felt Right installation.
The Tools:
- Level (most cell phones have a built-in level option)
- Measuring tape
- Pencil
- Felt Right sound panels
- Your hands
How To Hang Felt Sound Panels On the Wall
Follow this step-by-step process to hang your felt sound panels. Felt Right believes the installation process should be creative and easy- you get to watch your work of art come to life without worrying about complex installation techniques.
1. Preparation
Conceptualize where you want to hang your sound panels. You don’t want to start hanging without a clear picture in your head of the final design. Part of this occurs when you’re ordering your designs from the My Studio 2.0 page. However, once your felt panels ship to your home, you’ll want to double-check the layout before hanging the panels.
Layout your design on the ground and determine its center. Laying out your concept on the ground first will help you when you begin to place tiles on the wall.
2. Level
Now that you have your design mapped out in your head and on the floor in front of you, it’s time to put your hands to work. The first tile is the most critical tile to place correctly because the subsequent tiles must align with its placement.
Use a level and a pencil to mark the line where you want to place the first tile. This line serves as the reference point for how the rest of your installation will go, so make sure it’s straight and even. After drawing a beautiful line for your centerpiece, it’s time to peel and stick.
3. Peel
Each felt tile design has a specific peel layout. Knowing the difference between the various peel layouts will help you better understand how to apply pressure to each tile’s primary stick spots. First, peel the covering off the adhesives. After you peel the adhesive from the stick spots, it’s time to align your tiles, ensuring optimal placement.
Peel Layouts
Felt Right has six tile layouts, each with its own peel pattern. The tile layouts are the 12” square, the triangle, the shiplap pattern, the half shiplap pattern, the 6” quarter (square shape), and the pixel.
The 12” square has its peel tabs at all four corners, while the 6” quarter only has one peel tab in its center.
Both shiplap designs are essentially rectangles. The full shiplap has four peel tabs that offset each other throughout the back of the design. The half shiplap has two peel tabs, one on each of the shorter sides.
The triangle design has two peel tabs equally spaced from each other, and the pixel’s peel layout is an even smaller square than the 6” quarter with a peel tab also at its center. For a visual representation of these dimensions, visit our tab layout page.
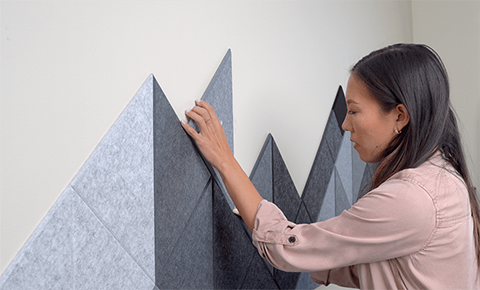
4. Align
Aligning the top edge of your tile will help facilitate the correct placement and pressure of each tile. It also allows you to readjust the tile without sticking it to the wall first. If you press before aligning the tile, you run the risk of setting an off-kilter tile in place. Doing so won’t ruin your design, but it will add extra time to your installation.
5. Press
Finally, the moment you’ve been waiting for. The next step is to apply pressure to your tiles and then stand back and witness your beautiful creation. However, before applying pressure, triple check to make sure your tiles are completely aligned with each other. You don’t want to finish the attachment only to find that you’re off-kilter.
When it comes to pressing the tiles, you won’t be pushing against the wall for long- there’s no sweat involved in Felt Right’s sound panel installation. Simply apply pressure for 30 seconds and then witness the firm, seamless attachment.

6. Enjoy
Time to sit back, relax, and enjoy your design in all of its noise-reducing beauty. After you complete your felt sound panel installation, you can reward yourself by christening your felt panels with an inspirational post-it note.
Upkeep
Our felt sound panels don’t require much upkeep. In fact, the only thing you have to remember when keeping your tiles clean is to vacuum them every once in a while. We recommend vacuuming your sound dampening panels about once every year. On the off chance they get wet, you can clean them by dabbing them with a dry cloth.
Can I Customize My Felt Sound Panel Design Further?
The great thing about Felt Right’s sound panels is that they can easily be cut into custom shapes. The chamfered edges make an ideal launching pad for your more extensive, custom sound dampening installation. Since installation is so simple, you will have more time to accentuate your existing design.
Outside the existing pattern grooves, customization can be a bit more intensive, so we recommend using a straight blade with a metal straight edge to guide your hand. Take care not to damage any other surfaces with your blade. Place the tiles on a blade-safe surface and apply even pressure throughout the cut.
Won’t I Need More Paint-Safe, Adhesive Tabs?
You may be wondering how you can cut your sound panels and still make them stick? Won’t you be messing with the peel-and-stick design? The good news is that you can easily order more wall-safe adhesive tabs.
Our packages contain four tabs each, making customization easy and affordable. Simply peel them, place them on your customized felt panel, and then stick it on your wall to witness your art come to life.
How Do I Remove Felt Sound Panels?
It’s as comforting as a summer breeze to know that you can remove your sound dampening installation without a single scratch or scar on your wall. It’s also intriguing to see that you can remove your felt panel design and reinstall it in another room.
Install your sound dampening panels in your at-home office for now, and when you go back into the office, add some more tiles to improve your living room entertainment with a larger, more customized design. The choice is yours.
The following two-step procedure shows you how to remove your felt sound panels safely.
1. Remove the Tiles
Remove the tile one corner at a time, taking care not to rip the tile off the wall but also applying enough pressure to peel it off. After removing the tiles, all that will be left will be the paint-safe adhesive tabs.
2. Roll the Adhesive Off the Wall
Use your thumb to roll the adhesive off the wall. You can start by peeling a corner of the paint-safe bond off the wall. Once one corner lifts from the wall, the process becomes easier. With our paint-safe adhesives, you never have to worry about damaging your wall.
Conclusion- How To Hang and Remove Felt Sound Panels
Whether you’re trying to reduce noise in your office or trying to enhance your entertainment experience, Felt Right’s felt sound panels accomplish your noise reduction needs. While some sound-reducing felt boards require intensive installation processes, Felt Right makes things easy. Additionally, Felt Right believes in providing its customers with highly-customizable designs.
Hanging your felt sound dampening panels is an easy process that you can take the afternoon to enjoy. When it’s time to rearrange or customize your design further, you can simply remove the tiles, roll the adhesive off the wall, and move the panels to their next destination.
If you’ve been trying to gain some more peace and quiet in your apartment or your house, and your walls have been looking a little bit barren, customize your felt wall titles on our site today. We can’t wait to bring new life and color into your home.